22 April 2009

Problem - PDF Color Printing

Sometimes you might find that a certain pdf will just not print properly or at all when sending to your favorite color printer. PDF files love being sent to a postscript printer. So check that your IT guy didn't install some PCL5c driver. Most copiers do not come with Postscript by default so hopefully the PCL 6 or alternate driver can solve your problem.
There is a setting you should try first, though. It is located in the advanced area of the Acrobat print screen.


It is called Print as Image. If that doesn't help, re-create the pdf file or give up and call somebody.

10 April 2009

Problem - Email Format is Set to Rich Text

Answer : Change your default email format from RTF (rich text format) to plain text or html.

Here is what you do.
Click on Tools then Options


Select the Mail Format tab
Make your selection in the dropdown list and press OK.

Visit http://www.system-products.com for more solutions


09 April 2009

Problem - Random Notes I Fail to Maintain

Keeping track of weird tech answers is more of a chore than interesting.
I personally find the challenge of *remembering* everything more inline with my "Johnny on the spot" mentality.

But here is a list of Random Notes I actually wrote down with little or no explanation.

Docuware using SQL 2008 – during install – change SQLClient checkversion to false in NETCOMMON - during error 1920 of Authentication Server – kill process and change checkversion in File Path – then click Retry – after install of Content and Workflow – change checkversion in file paths and restart services


PCTools installed Layer @ protocol that prevents internet access.
Must run Diagnostics to remove

Restart XP – Scheduled Task – system32\shutdown.exe /r

Docuware install script will fail unless Windows 3.1 Installer is already on the machine. Clients also need read access to the installation media path. Seems like a not brainer but some of the files were unable to read with an access denied error ??? Weird – not sure but had to specify users and force permissions to propagate down.

Routing and Remote Access wizard disables NetBIOS over TCP/IP which prevents SMB scanning from copier. Workstations are able to use the new SMB over TCP/IP port 445. Copiers cannot.

Import of license file error during upgrade - find the answer Docuware 5.1b -5.1 license was Enterprise – cannot downgrade to Professional


Defined – select list only

Docuware Printing – Disable Advanced Printer Features – Make sure to use Vector graphics – not raster

Problem with E-Automate Sales Order Screen – required deletion of Digital Gateway registry settings for that user

Antivirus XP 2008 MalWare Virus – had to remove key after changing Background – Explorer would not start

HKEY_LOCAL_MACHINE\SOFTWARE\Microsft\Windows NT\CurrentVersion\Image File Execution Options\explorer.exe

Possible
1.HKEY_CURRENT_USER\Software\Microsoft\Windows\CurrentVersion\Policies\System
4. Right-click NoDispScrSavPage to select Modify.
Change the value to 0.
5. Do exactly the same with the NoDispBackgroundPage entry
Batch command shutdown -s -f

Outlook 2003 Exchange – Delegates receiving Calendar Invites – Remove Delegate – wait 30 minutes for system to reset

Ricoh Fax toggle printing of Confirmation Report
Set User Function key F1-F3 to Print TX Result
User Tools – Fax Features – General Settings Adjust – Set User Function Key

ISA 2004 blocks FTP uploads by default – override with Configure FTP on Allow All profile

No Network / Internet works - Laptop was using TCP v6 after installing Wireless Broadband Service
Turn off TCP v6 and turn on Client for Microsoft and File sharing to fix.

Find solution for Ricoh products not working with Domain Security *sometimes*
Workaround is to create local user and specify sharing and security rights

240W Controller - When switching internal cards the license will give error until you download correct file from rspfiles.com

Ecopy ShareScan – when saving QuickConnect to new name the settings go back to default for file type and scanner settings

Emedded @Remote causing lockup of machine when performing registration
Special Service Mode 5-870-003 and 001

Embedded Error 12005 – set to Do not prohibit
User Tools -> System Settings -> Administrator Tools -> Extended Security -> Remote Service => "Do not Prohibit".

Update of ISA 2004 stopped firewall and caused SMTP and POP not to start

Use EXMERGE to archive ( delete ) large number of emails from mailbox in Exchange 2003

Download latest Intel graphics driver to enable 1680x1050 resolution

Use devcon.exe to restart wireless adapters automatically
c:\batch\devcon.exe restart =NET PCI\VEN_14E4*

Outlook 2003 html emails using shrink to fit of IE7 – modify registry and set STF to 100%
Windows Registry Editor Version 5.00

[HKEY_LOCAL_MACHINE\SOFTWARE\Microsoft\Internet Explorer\MAIN\FeatureControl\FEATURE_STF_SCALE_MIN]
"OUTLOOK.EXE"=dword:00000064

Windows Installer Cleanup Utility necessary to remove Plotbase 3.3 from db because the uninstall option was not listed in Add Remove Programs

LD265 – Update Delivery Server Address Book located in User Tools – Scanner Features

08 April 2009

Problem - Things You Need to Know

Free Stuff that helps save you time and money

Xobni = Indexing program for Outlook - helps you find relevant info fast
Zoho = Online programs that may be useful for Small Businesses
OpenOffice = Microsoft Office Clone - doesn't do everything, but who does

Problem - How to Install Network Scanning on Ricoh - Lanier - Savin copiers

Short Answer

1. Create a special user whose password never changes - only necessary on Vista or PCs with Domain security.
2. Create a share folder named scans
3. Assign the special user to the sharing and security settings - giving full control ( access ) to the folder
4. Program the user in the (Configuration - File Transfer - SMB User Name and Password ) of the copier
5. Create an Address Book entry with the UNC path to the shared folder\subfolder

Long Answer

1. Create a special user whose password never changes
This is important for server scanning and workstations that are part of a domain and is necessary for Vista users also. I will not go into specifics about how to create a user. Just create a local user on the pc where you plan on creating the scans folder.

2. Create a share folder for scans
Unless you already have a shared folder where users store files, it is best to isolate the scanning share folder to prevent problems with folder permissions.


Scanning directly to workstations - Workgroup

Right-click the folder and select Properties then click the Sharing tab
Click the link that says you understand the security risks and do not want to run the wizard

XP Picture


Click the Just Enable option and hit OK


You need to check the box to share the folder and the box to Allow users to change my files
( this gives the copier permission to save the scanned images )


Scanning directly to server/workstations - Domain / Vista

Right-click the folder and select Properties then click the Sharing tab
(I will show you Vista images but the others are really similar)
For Vista you want to click on the Advanced Sharing button, otherwise the next image will be more familiar


Click the button or box to share - then click on the permissions button


Here is where you add the special user and assign Full Control


This is where you give the special user local rights to the folder
( using the Everyone group doesn't always work well )


4. Program the user into the copier as a default
Workgroup PCs need to have something in these fields also
Log into the web interface of the copier using the IP address.
( I assume you already have the copier networked for printing )
Click the login link in the Upper right


The Login User Name is admin - there is no password


( Some older models had no user and the password was password )

Click on the Configuration link on the left
Click the File Tranfer link in the Device Settings column
Enter the name of the special user and press the Change button for the Password


Enter the password twice and click OK on both screens


5. Create an Address Book entry for the Shared folder

This part requires you to know either the Name of the PC or it's IP address ( for servers it is best to use the IP address )
Logged in as admin - click the Address Book link on the left
Then click the Add User button
Give the Scan destination a name and key display ( usually the same )
You can also assign the record to a Title - *rolodex* type system if you have more than 12 users


Next scroll down to the bottom where the Folder section is located
Enter the UNC path to the share folder destination "\\ipaddress\scans\" and click OK to save


-----------------------------

Troubleshooting

1. Windows Firewall and File and Printer sharing becomes disabled on the PCs network adapter
2. Internet Security software needs to be configured to TRUST the copier
3. You used an IP address to one of the workstations but it changed
4. The special user you used changed their password
5. Laptops are known for not being reliable when scanning by Computer Name
6. Netbios over TCP/IP is disabled on the PCs network adapter
7. Always double-check that the special user has specific rights to the Sharing and Security of the folder.

Comment

You can also program the addresses into the copier using the front panel
User Tools - System Settings - Administrator Tools - Address Book Management
( this actually allows you to browse your network for shared folders )
It is not always reliable, but helps to isolate individual PCs that fail to make themselves available

Problem - Installing a Network Printer on Windows XP Vista 2003 2008

There are many simple steps to installing a network printer. I will outline the straightforward method first, then give some information about abnormal situations.

I know this is a lot of information to read and understand. Think of it as an investment and not a burden. I have tried to include what is necessary without writing a whole book about a 5 minute procedure.

Summary of steps to install a network printer.
1. Download the most recent driver from the manufacturer's website.
2. Configure network settings on the printer.
3. Use the Add Printer Wizard to create a local network printer on the pc.
4. (Optional) - share printer to other users.

If you are performing this type of installation for more than a handful of people, it is best to install this once on a Windows Server and share that printer to everyone. Normally it takes between 5 and 10 minutes to perform this type of install on each pc.

1. Download the most recent driver.
Visit the manufacturer's website to obtain the latest driver - print drivers can be found in the support area searching by model number.
( this is important because early problems are fixed and drivers are updated )
For color printers you want to download a PostScript driver.
Black and White - monochrome printers work fine with a PCL driver.
*Run-Unzip-Extract* to a known location on the computer -
c:\temp -or- c:\*printer model*

2. Configure network settings on the printer
If you are a small business or an at home office you probably have a tiny router that handles what is called DHCP ( this is a service that manages IP addresses ).

The bad thing about these little devices is when they lose power, IP addresses are re-assigned on a first come basis.

I suggest using a static IP for all installations. Log into your printers web interface using the DHCP assigned IP address and change it to a static IP high in the range.

If available, I use 192.168.1.201, since most routers start assigning IPs at 192.168.1.2

If you have IT people who control your network, they should be consulted before making any changes to IP settings.

3. Using the Add Printer wizard
I will show pictures from Vista but it is almost identical on the other systems.
Go to Printers in the Control Panel - there are different ways to get there - just find one

Click the Add a Printer link


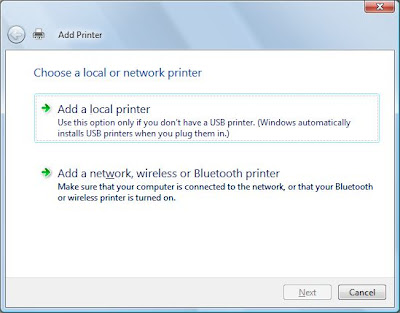
Choose - Add a local printer

**Note** - I know you have a network printer and the second choice is network printer and it makes logical sense to choose that - but you have to trust me and not think for yourself on this one.


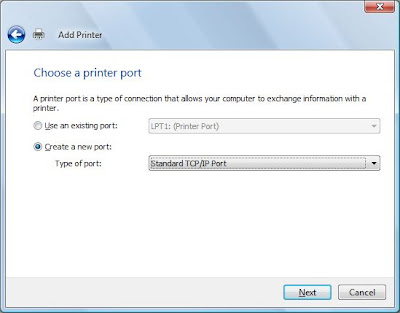
Choose to Create a new port - select Standard TCP/IP Port in the dropdown list


Fill in the information - IP address you chose to use - for the picture i used 192.168.1.92


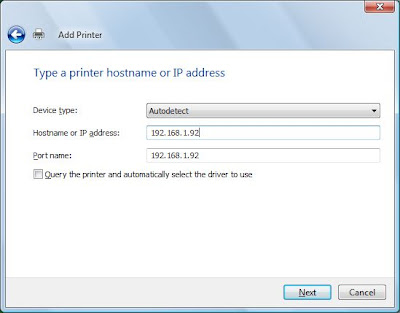
If it detects the device type - great - if it doesn't - click OK and Next anyway
( leave it generic or whatever it says )

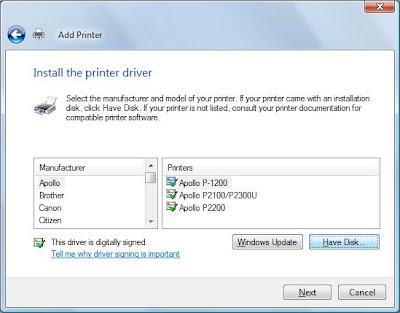
Next is where we browse to the location you Extracted-unzipped the drivers ( this could also be to the CD you have ). Most of time when you download drivers they are in exe form or zipped and have to be Run and extracted before becoming available for use

Install the printer driver
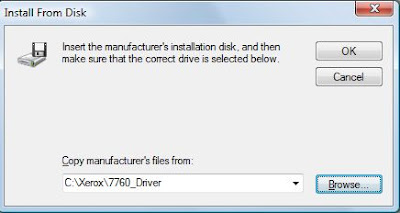
Click Have Disk


Click Browse


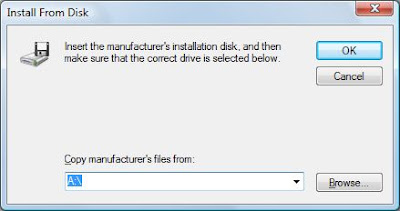
Navigate to the location containing an INF file within the driver directory you created


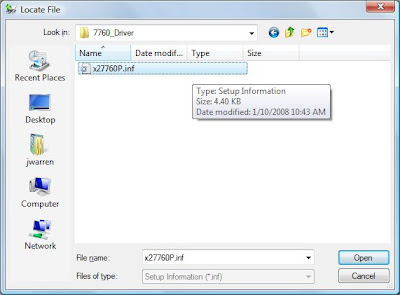
Double-click the inf file or select it and click Open

Then click the OK button


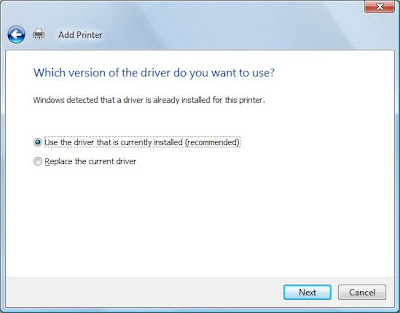
Select your model and click Next


If it asks you to keep or replace the driver ( make a choice )


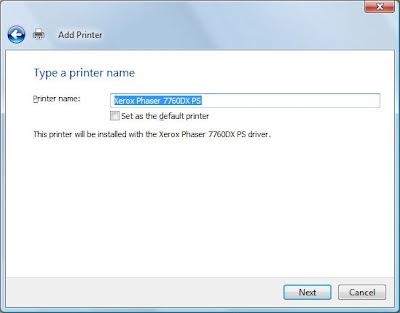
Then you will be asked to name the printer - On a server install it is best to make this a general term like - Office Color - or - Department BW.


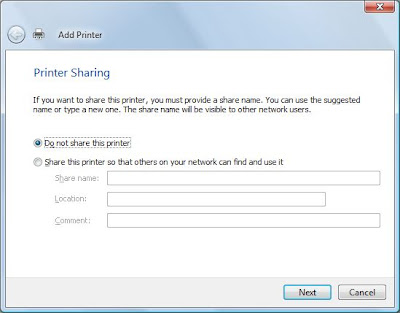
Then you will be asked to Share the printer ( this is the Optional part for Server installs )


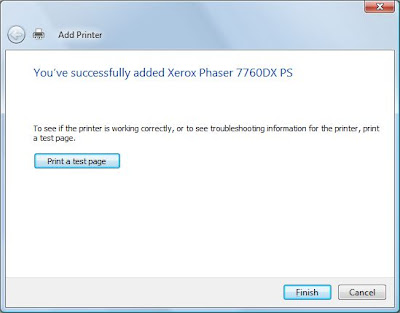
Just click Finish and the driver will be installed


4. Optional sharing the printer

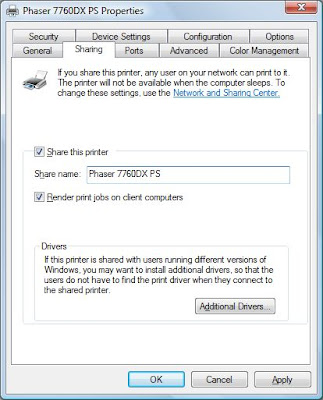
Right-click the printer in Printers and Faxes and select Properties

click on the Sharing tab and choose to share and give it a share name


**Note**
The Network Printer option I told you to ignore earlier is for connecting to shared printers

The fast way to install a *shared* printer is to

Click Start and select Run ( if you do not have a run just type the name into an address bar )

Type in the name of the PC with the shared printer

the example uses "\\demoroom\"
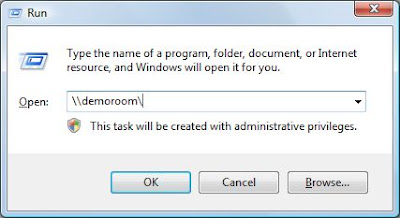


Click OK

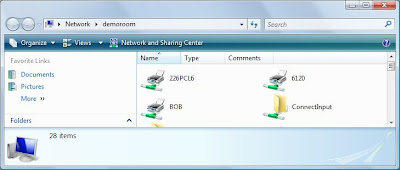
You will be presented with share folders and printers

Double-click the printer to install


-------------------------
Troubleshooting

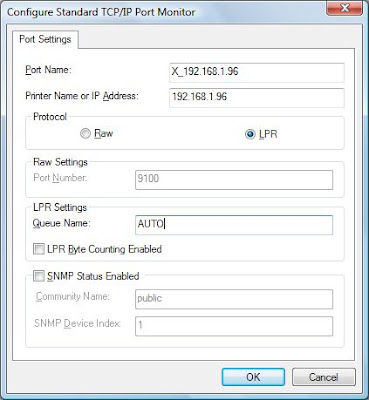
1. Some printers need to have the port configured for a different RAW number or with LPR settings

The documentation or support site should cover what special settings are required

Sometimes the default 9100 needs to be changed to another number, but usually it is an LPR port with a queue name of LPT1 - PORT1 - PS - AUTO - or lp , the LPR Byte Counting is sometimes necessary also.

You can configure these settings by going to the Properties of the printer ,

select the Ports tab and click the Configure Port button.


2. The format of the IP address is important - do not use any leading zeroes that you may see on a config page or web screen

i.e. 192.168.001.201 should be programmed into the port as 192.168.1.201

3. IP addresses are important - normally on small networks 192.168.0. networks cannot print to 192.168.1 addresses - If your router changes its settings are has to be reconfigured, be sure to double check that you are an the same *Network ID* (first three sets of numbers), I have seen routers change back and forth between networks and different brands use different defaults.

4. Sometimes the ports on servers and workstations become corrupted and need to be deleted and recreated.

5. Sometimes you might have a *Network Security* application that blocks communication to a new printer - watch for popups when attempting your first print.

Final Thoughts
If you read all the way to here, you probably need more help.